Trong mô hình microservices, client sẽ phải tương tác với rất nhiều services. Vậy làm sao mà client có thể biết được cần gọi endpoint nào để gọi ?
API gateway là gì ?
API Gateway chịu trách nhiệm định tuyến các request, tổng hợp và chuyển đổi giao thức. Tất cả các request từ client sẽ đi qua API Gateway trước tiên. Sau đó nó định tuyến các request tới các microservice thích hợp. Nó giống như một tổng đài để điều phối các request đến từ trình duyệt (dạng HTTP REST request hay request đến URL một trang web). Nếu chúng ta không sử dụng API Gateway thì clients sẽ phải gử i request trực tiếp tới service cụ thể nào đó. Nó sẽ dẫn đến một số vấn đề rắc rối với client:
Phần code phía client sẽ trở nên phức tạp vì phải tracking nhiều endpoint
Sẽ tạo sự kết nối giữa client và backend. Client cần biết được các services đó đc phân chia như thế nào -> rất khó cho việc maitain của client và refactor service.
Mỗi một service sẽ phải handle nhiều vấn đề liên quan như authentiaction, SSL hay client rate limiting
Ưu và nhược điểm của API Gateway
Ưu điểm lớn nhất khi sử dụng API Gateway là nó che giấu đi cấu trúc bên trong của ứng dụng. Thay vì truy vấn đến các service cụ thể, client đơn giản sẽ chỉ cần call thông qua API Gateway (nó cung cấp API phù hợp với từng Client).
Nhược điểm: Nó sẽ trở thành nút thắt cổ chai khi phát triển hệ thống. Developer cần phải cập nhập API Gateway để cung cấp cho các endpoint của microservice. Quan trọng là phải làm cho quá trình cập nhật API Gateway càng nhẹ càng tốt.
Gom API với API Gateway
Có nhiều lựa chọn để làm API Gateway chuyên dụng như: Kong API, Tik,... hay gần đây có traefik. Nhiều quá chưa tìm hiểu được
Nhưng mình sẽ sử dụng Nginx - một Reverse proxy server với load balancing, SSL,... Đầu tiên tạo 2 services như sau: mentor, mentee. Về cơ bản thì services thứ nhất sẽ trả về mentee và detail định nghĩa như sau:
const express =require('express');const app =express();
app.get('/',(req,res)=>{
res.status(200).json({
data:{
id:'1',
type:'mentee',
attributes:{
name:'NamDV',}}})})
app.get('/namdv',(req,res)=>{
res.status(200).json({
data:{
id:'1',
type:'mentee',
attributes:{
name:'NamDV',class:'C13'}}})})
app.listen(3000,()=>{
console.log('App is running at port 3000');})
Và services còn lại sẽ trả về mentor định nghĩa như sau:
const express =require('express');const app =express();
app.get('/',(req,res)=>{
res.status(200).json({
data:{
id:'1',
type:'mentor',
attributes:{
name:'HaiDV',}}})})
app.listen(3001,()=>{
console.log('App is running at port 3001');})
Nhiệm vụ của chúng ta giờ phải deploy một API gateway để gom và điều phối request từ client. Chúng ta config nginx cơ bản như sau:
upstream định nghĩa một pool của các server mà NGINX sẽ gửi các request tới và định nghĩa tên để tham chiếu sau này. Có thể hiểu là mỗi upstream là một load balancer.
Ở đây mọi người cần chú ý phần location. Nginx sẽ phân tích URI của request để tìm ra hướng xử lí của request dựa vào các block location. Với những request có URI là /mentee hoặc /mentee/11 sẽ được sử lý trong location block đầu tiên và tương tự /mentor cũng vậy.
rewrite option sẽ viết lại URI tới dựa trên một regular expression để location block có thể xử lý nó. Ở đây ví dụ như request URI là /mentee/namdv sẽ được regex bắt lại và nginx rewrite thành /namdv
break flag ở cuối có thể hiểu là nó sẽ dừng hẳn process sau khi thay đổi URI và URI đã write sẽ ko tới các location khác trong file config.
proxy_pass sẽ gửi request tới một proxy server cụ thể. Ở đây là http://app1_upstream/namdv chẳng hạn (routes do service đầu tiên đã định nghĩa ).
Phần docker-compose thì mọi người xem chi tiết tại đây nhé docker-compose.yml
Ok giờ thì vào /etc/hosts để add host uptodown.dev vào. (add dòng này vào 127.0.0.1 uptodown.dev)
Ngon. giờ thì đơn giản là docker-compose up và test thử với curl xem nào: curl -i -H "Accept: application/json" "http://uptodown.dev/mentee" và kết quả là:
The primary function of the API gateway is to provide a single, consistent entry point for multiple APIs, regardless of how they are implemented or deployed at the backend. Not all APIs are microservices applications. Our API gateway needs to manage existing APIs, monoliths, and applications undergoing a partial transition to microservices.
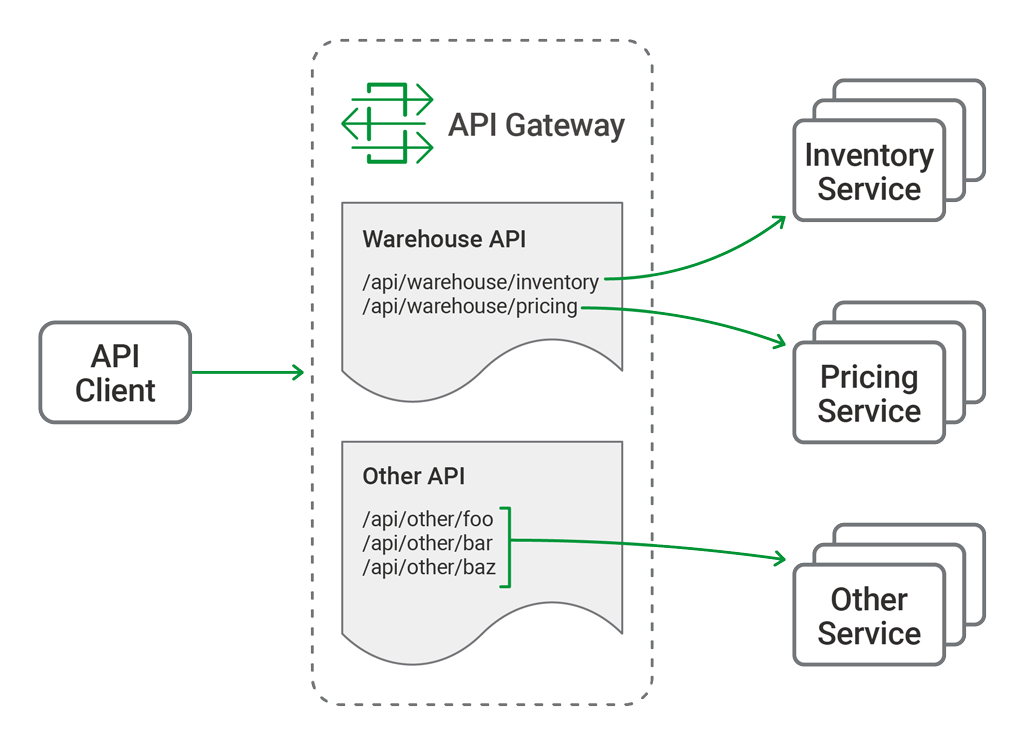
In this blog post we refer to a hypothetical API for inventory management, the “Warehouse API”. We use sample configuration code to illustrate different use cases. The Warehouse API is a RESTful API that consumes JSON requests and produces JSON responses. The use of JSON is not, however, a limitation or requirement of NGINX Plus when deployed as an API gateway; NGINX Plus is agnostic to the architectural style and data formats used by the APIs themselves.
The Warehouse API is implemented as a collection of discrete microservices and published as a single API. The inventory and pricing resources are implemented as separate services and deployed to different backends. So the API’s path structure is:
api
└── warehouse
    ├── inventory
    └── pricing
As an example, to query the current warehouse inventory, a client application makes an HTTP GET request to /api/warehouse/inventory.
API gateway architecture for multiple applications
Organizing the NGINX Configuration
One advantage of using NGINX Plus as an API gateway is that it can perform that role while simultaneously acting as a reverse proxy, load balancer, and web server for existing HTTP traffic. If NGINX Plus is already part of your application delivery stack then it is generally unnecessary to deploy a separate API gateway. However, some of the default behavior expected of an API gateway differs from that expected for browser‑based traffic. For that reason we separate the API gateway configuration from any existing (or future) configuration for browser‑based traffic.
To achieve this separation, we create a configuration layout that supports a multi‑purpose NGINX Plus instance, and provides a convenient structure for automating configuration deployment through CI/CD pipelines. The resulting directory structure under /etc/nginx looks like this.
etc/
└── nginx/
    ├── api_conf.d/ ………………………………… Subdirectory for per-API configuration
    │   └── warehouse_api.conf …… Definition and policy of the Warehouse API
    ├── api_backends.conf ………………… The backend services (upstreams)
    ├── api_gateway.conf …………………… Top-level configuration for the API gateway server
    ├── api_json_errors.conf ………… HTTP error responses in JSON format
    ├── conf.d/
    │   ├── ...
    │   └── existing_apps.conf
    └── nginx.conf
The directories and filenames for all API gateway configuration are prefixed with api_. Each of these files and directories enable different features and capabilities of the API gateway and are explained in detail below.
Defining the Top-Level API Gateway
All NGINX configuration starts with the main configuration file, nginx.conf. To read in the API gateway configuration, we add an include directive in the http block in nginx.conf that references the file containing the gateway configuration, api_gateway.conf (line 28 just below). Note that the default nginx.conf file uses an include directive to pull in browser‑based HTTP configuration from the conf.d subdirectory (line 29). This blog post makes extensive use of the include directive to aid readability and to enable automation of some parts of the configuration.
include /etc/nginx/api_gateway.conf; # All API gateway configuration
include /etc/nginx/conf.d/*.conf; # Regular web traffic
The api_gateway.conf file defines the virtual server that exposes NGINX Plus as an API gateway to clients. This configuration exposes all of the APIs published by the API gateway at a single entry point, https://api.example.com/ (line 13), protected by TLS as configured on lines 16 through 21. Notice that this configuration is purely HTTPS – there is no plaintext HTTP listener. We expect API clients to know the correct entry point and to make HTTPS connections by default.
This configuration is intended to be static – the details of individual APIs and their backend services are specified in the files referenced by the include directive on line 24. Lines 27 through 30 deal with logging defaults and error handling, and are discussed in Responding to Errors below.
Single-Service vs. Microservice API Backends
Some APIs may be implemented at a single backend, although we normally expect there to be more than one, for resilience or load balancing reasons. With microservices APIs, we define individual backends for each service; together they function as the complete API. Here, our Warehouse API is deployed as two separate services, each with multiple backends.
All of the backend API services, for all of the APIs published by the API gateway, are defined in api_backends.conf. Here we use multiple IP address‑port pairs in each upstream block to indicate where the API code is deployed, but hostnames can also be used. NGINX Plus subscribers can also take advantage of dynamic DNS load balancing to have new backends added to the runtime configuration automatically.
Defining the Warehouse API
This part of the configuration first defines the valid URIs for the Warehouse API and then defines a common policy for handling requests to the Warehouse API.
# API definition
#
location/api/warehouse/inventory {
set$upstream warehouse_inventory;
rewrite^ /_warehouse last;
}
location/api/warehouse/pricing {
set$upstream warehouse_pricing;
rewrite^ /_warehouse last;
}
# Policy section
#
location= /_warehouse {
internal;
set$api_name"Warehouse";
# Policy configuration here (authentication, rate limiting, logging, more...)
The Warehouse API is defined with a number of location blocks. NGINX Plus has a highly efficient and flexible system for matching the request URI to a section of the configuration. In general, a request is matched by the most specific path prefix and the order of the location directives is not important. Here, on lines 3 and 8 we define two path prefixes. In each case the $upstream variable is set to the name of the upstream block that represents the backend API service or services for the inventory and pricing services respectively.
The goal of this configuration is to separate API definition from the policy governing how the API is delivered. To achieve this, we minimize the configuration that appears in the API definition section. After determining the appropriate upstream group for each location, we stop processing and use a rewrite directive to find the policy for the API (line 10).
Using the rewrite directive to move processing to the API policy section
The result of the rewrite directive is that NGINX Plus searches for a location block that matches URIs starting with /_warehouse. The location block on line 15 uses the = modifier to perform an exact match, which speeds up processing.
At this stage our policy section is very simple. The location block itself is marked as internal on line 16, meaning that clients cannot make requests to it directly. The $api_name variable is redefined to match the name of the API so that it appears correctly in log files. Finally, the request is proxied to the upstream group specified in the API definition section, using the $request_uri variable – which contains the original request URI, unmodified.
Choosing Broad vs. Precise Definition for APIs
There are two approaches to API definition – broad and precise. The most suitable approach for each API depends on the API’s security requirements and whether it is desirable for the backend services to handle invalid URIs.
In warehouse_api_simple.conf, we use the broad approach for the Warehouse API by defining URI prefixes on lines 3 and 8. This means that any URI that begins with either prefix is proxied to the appropriate backend service. With prefix‑based location matching, API requests to the following URIs are all valid:
If the only consideration is proxying each request to the correct backend service, the broad approach provides the fastest processing and most compact configuration. On the other hand, the precise approach enables the API gateway to understand the API’s full URI space by explicitly defining the URI path for each available API resource. Taking the precise approach, the following configuration for the Warehouse API uses a combination of exact matching (=) and regular expressions (~) to define each and every URI.
This configuration is more verbose, but more accurately describes the resources implemented by the backend services. This has the advantage of protecting the backend services from malformed client requests, at the cost of some small additional overhead for regular expression matching. With this configuration in place, NGINX Plus accepts some URIs and rejects others as invalid:
Valid URIs
Invalid URIs
/api/warehouse/inventory
/api/warehouse/inventory/
/api/warehouse/inventory/shelf/foo
/api/warehouse/inventoryfoo
/api/warehouse/inventory/shelf/foo/box/bar
/api/warehouse/inventory/shelf
/api/warehouse/inventory/shelf/-/box/-
/api/warehouse/inventory/shelf/foo/bar
/api/warehouse/pricing/baz
/api/warehouse/pricing
/api/warehouse/pricing/baz/pub
Using a precise API definition enables existing API documentation formats to drive the configuration of the API gateway. It is possible to automate the NGINX Plus API definitions from the OpenAPI Specification (formerly Swagger). A sample script for this purpose is provided among the Gists for this blog post.
Rewriting Client Requests
As APIs evolve, breaking changes sometimes occur that require clients to be updated. One such example is when an API resource is renamed or moved. Unlike a web browser, an API gateway cannot send its clients a redirect (code 301) naming the new location. Fortunately, when it’s impractical to modify API clients, we can rewrite client requests on the fly.
In the following example, we can see on line 3 that the pricing service was previously implemented as part of the inventory service: the rewrite directive converts requests made to the old pricing resource to the new pricing service.
Rewriting the URI on the fly means that we can no longer use the $request_uri variable when we ultimately proxy the request at line 26 (as we did on line 21 of warehouse_api_simple.conf). This means we need to use slightly different rewrite directives on lines 9 and 14 of the API definition section in order to preserve the URI as processing switches to the policy section.
Using the rewrite directive to move processing to the API policy section while preserving the URI
Responding to Errors
One of the key differences between HTTP APIs and browser‑based traffic is how errors are communicated to the client. When NGINX Plus is deployed as an API gateway, we configure it to return errors in a way that best suits the API clients.
The top‑level API gateway configuration includes a section that defines how to handle error responses.
# Error responses
error_page404 = @400; # Invalid paths are treated as bad requests
proxy_intercept_errors on; # Do not send backend errors to the client
include api_json_errors.conf; # API client friendly JSON error responses
default_type application/json; # If no content-type then assume JSON
The error_page directive on line 27 specifies that when a request does not match any of the API definitions, NGINX Plus returns the 400 (BadRequest) error instead of the default 404 (NotFound) error. This (optional) behavior requires that API clients make requests only to the valid URIs included in the API documentation, and prevents unauthorized clients from discovering the URI structure of the APIs published through the API gateway.
Line 28 refers to errors generated by the backend services themselves. Unhandled exceptions may contain stack traces or other sensitive data that we don’t want to be sent to the client. This configuration adds a further level of protection by sending a standardized error to the client.
The complete list of error responses is defined in a separate configuration file referenced by the include directive on line 29, the first few lines of which are shown below. This file can be modified if a different error format is preferred, and by changing the default_type value on line 30 of api_gateway.conf to match. You can also have a separate include directive in each API’s policy section to define a different set of error responses which override the default.
API keys are a shared secret known by the client and the API gateway. They are essentially a long and complex password issued to the API client as a long‑term credential. Creating API keys is simple – just encode a random number as in this example.
On line 6 of the top‑level API gateway configuration file, api_gateway.conf, we include a file called api_keys.conf, which contains an API key for each API client, identified by the client’s name or other description.
The API keys are defined within a map block. The map directive takes two parameters. The first defines where to find the API key, in this case in the apikey HTTP header of the client request as captured in the $http_apikey variable. The second parameter creates a new variable ($api_client_name) and sets it to the value of the second parameter on the line where the first parameter matches the key.
For example, when a client presents the API key 7B5zIqmRGXmrJTFmKa99vcit, the $api_client_name variable is set to client_one. This variable can be used to check for authenticated clients and included in log entries for more detailed auditing.
The format of the map block is simple and easy to integrate into automation workflows that generate the api_keys.conf file from an existing credential store. API key authentication is enforced by the policy section for each API.
Clients are expected to present their API key in the apikey HTTP header. If this header is missing or empty (line 20), we send a 401 response to tell the client that authentication is required. Line 23 handles the case where the API key does not match any of the keys in the map block – in which case the default parameter on line 2 of api_keys.conf sets $api_client_name to an empty string – and we send a 403 response to tell the client that authentication failed.
With this configuration in place, the Warehouse API now implements API key authentication.
This first blog in a series details a complete solution for deploying NGINX Plus as an API gateway. The complete set of files discussed in this blog can be reviewed and downloaded from our GitHub Gist repo.
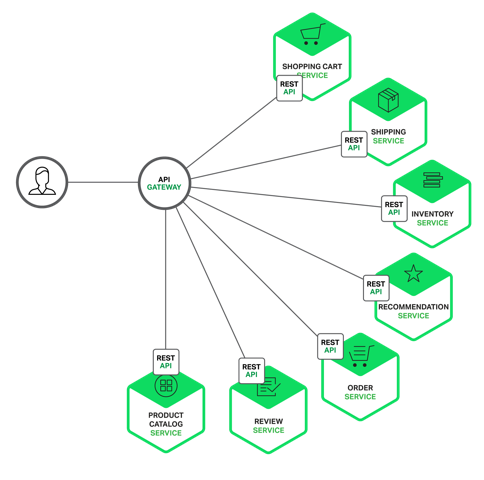 API Gateway chịu trách nhiệm định tuyến các request, tổng hợp và chuyển đổi giao thức. Tất cả các request từ client sẽ đi qua API Gateway trước tiên. Sau đó nó định tuyến các request tới các microservice thích hợp. Nó giống như một tổng đài để điều phối các request đến từ trình duyệt (dạng HTTP REST request hay request đến URL một trang web). Nếu chúng ta không sử dụng API Gateway thì clients sẽ phải gử i request trực tiếp tới service cụ thể nào đó. Nó sẽ dẫn đến một số vấn đề rắc rối với client:
 ).
).